

When I picked up Ender from school yesterday, there was a girl holding a little paper duck she had made. It looked pretty cute and different from a lot of paper crafts I've seen, so I decided Ender and I would try our hand at making one when we got home.
Since I did it by sight, I may have done things differently, but the outcome is pretty much the same. So here is the paper duck:

 |
| So...I used staples and tape here and there, because I get really impatient with glue. |
It would probably look more Easter-worthy if it were yellow or pastel, I guess, but Ender chose blue. He also later colored spots on it to make it even more cute! Ender and Scarlett each made their own as well. I should have taken pictures before Scarlett decided it was fun to smash the paper ducks...
If you can't piece it together from looking at it (or you don't feel like it--and trust me, I'm not judging you either way), I decided to put together some instructions that hopefully kids can understand, since this is a project for children anyway. Younger children will definitely need help!
WHAT YOU NEED:
- scissors
- paper
- gluestick
HERE ARE THE PARTS YOU NEED TO CUT OUT FOR YOUR DUCK:
You may print and use the guideline to trace the parts onto your colored paper.
To print, right click and save image. Align paper for landscape printing.
- White eye circles
- Colored double-circle for behind the eyes
- 2 feet
- 1 bill
- 2 wings
- 1 tail
- 4 skinny strips of paper, equal in length

When making the bill/beak, fold your paper in half and line up the trace-shape so that the dotted line ("on fold") is on the folded edge of your paper. Only cut the curved line of the beak, not the dotted line on the fold. When you finish cutting, the paper will open like a mouth.
After cutting out your pieces, follow these instructions:

A. Put glue in the middle of one of the strips of paper. Lay a second strip across the glue. Try to match up the middle of the first strip with the middle of the second strip.
B. Repeat this process by putting glue in the middle of the second strip now.
C. Lay a third strip across the second one, at an angle like a piece of the letter X (again trying to match up the middle of each strip).
D. Put glue on the middle of the third strip.
E. Now place the last strip across the middle of the third strip, like the other piece of the letter X.
F. All the strips put together will now look like a + and an x laid on top of each other.
 |
| This part may be the most difficult. Look at the picture of the completed duck for reference. |
A. Grab the top and bottom of the first strip you used (the ends of the vertical line). Bring the tips together and glue. Do not glue the ends to the middles of the other strips; think of the picture of the completed duck. You are making a sort of bubble-shaped body.
B. Now grab the ends of the second strip (the horizontal line). Glue the tips together on the tips of the first strip.
C. Now grab the ends of the third strip. Glue the tips together on the top of the first and second strips.
D. Now grab the ends of the last strip and glue its tips together on the top of the other strips. You may want to press the ends together while the glue dries. You have made a paper ball! This is the body of the duck.

A. Glue the eye circles onto the piece made for the back of the eyes.
B. Draw pupils on the eyes.
C. Glue the eyes onto the body (use the tab; you may want to fold the tab a little first to help the eyes stand up from the body). You may glue the eyes near the top of one of the strips or directly on top of the body.
 |
| It is starting to look more like a duck! |
A. Glue the tongue inside the bill.
B. Glue the bill onto the tab that is part of the back-of-the-eyes piece.
C. Draw two little nostrils on the bill.
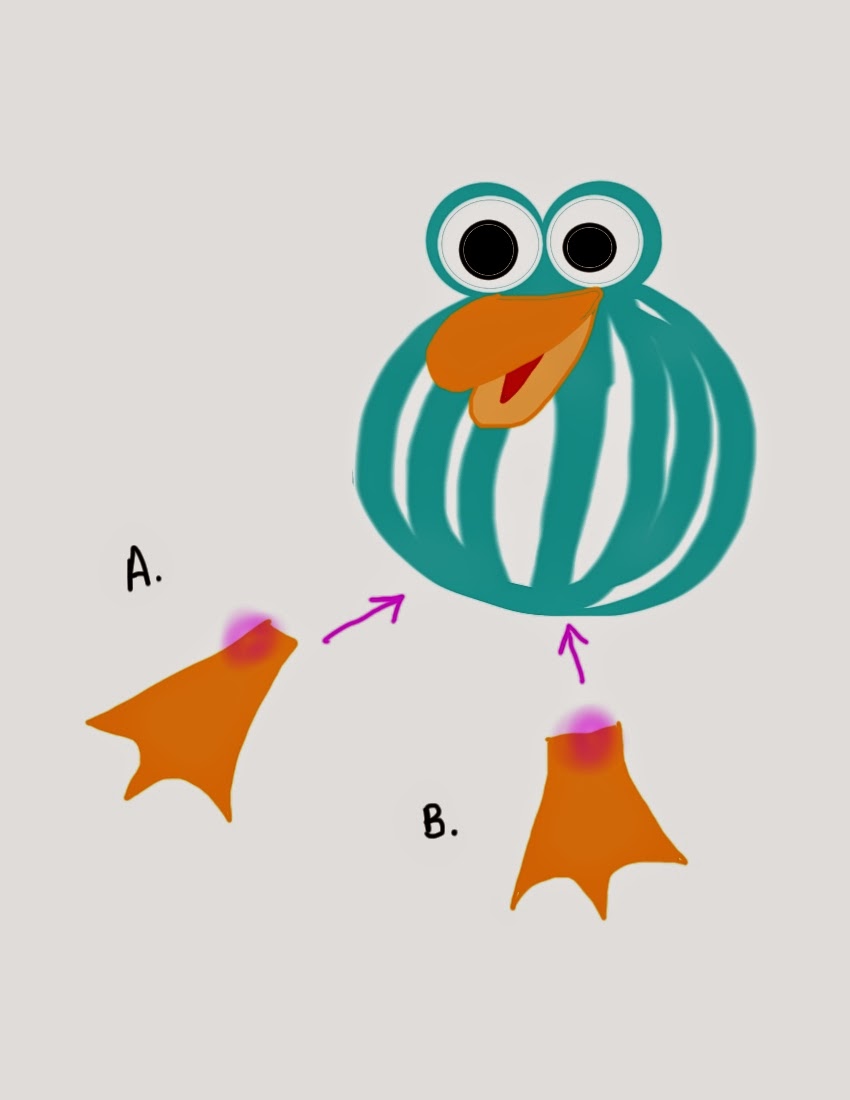
A. Glue the first foot underneath the body...
B. And glue the second foot underneath the body.

A. Pay attention to which side of the wing you put your glue so that the "ruffle" of feathers face the right way. Glue the first wing onto one side of the body. The wings can point up or down, or you can even fold them slightly so they stick straight out from the body.
B. Glue the second wing on the other side of the body.

A. This is the last step! Glue the tail onto the back of the duck's body, and you are finished!
With this bubble-shaped body, the paper duck is kind of bouncy and fun to toss around in your hands. Once you know how to make the body, you can be creative with the extra body parts and make all kinds of animals! What pieces would you need to make a bunny? A sheep? Or even an elephant? You can certainly branch out from typical Easter animals!
.JPG)
.JPG)
.JPG)
.JPG)

They are so cute! What a fun project!
ReplyDeleteThat's adorable!
ReplyDelete--Rachel